How to Hang Wallpaper Around a Curve
Hanging wallpaper around a curved window, pipe, or other obstacle can be tricky for the first-time paperhanger. With the guidance of expert installer, Lynnie Winter, you will be able to tackle any problem area you might encounter on your project.
Tools Needed:
- Smoothing Tool
- Scissors
- Joint Knife
- Snap-Blade Knife
PRO Tip: Before you hang your first strip of wallpaper, take a moment to Engineer the Room. Consider any focal areas, like bay windows, fireplaces, or large furniture. For wallcoverings with a distinct pattern, plan a starting point that centers your pattern above the focal area. Map out the seam placement for each strip and ensure that you allow for enough material for trimming around obstacles like windows and doors.
Start by tacking your strip to the wall along the ceiling. Allow the piece to hang over, or to the side of your obstacle. Make sure the pattern matches any previously installed wallpaper. With the strip in place, feel for the edge of the window and cut away the bulk of the excess paper.

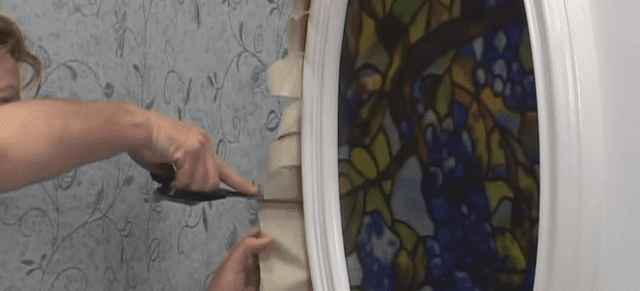
Relief Cuts
Once some of the excess has been removed, you can begin making relief cuts. Feel for the edge of the molding with one hand and use a pair of scissors in the other to make a series of small relief cuts along the edge of the obstacle. These are shallow cuts made every few inches along the obstacle that will allow the paper to fold along the curve more easily.

With the relief cuts in place, smooth the wallpaper from the ceiling down and along the curve. Set your seams and wipe away any excess adhesive that may squeeze out. Use your smoothing tool to press the paper tightly along the molding. With a fresh blade and taping knife, slowly trim the excess paper along the curve. Then wipe away any excess paste from the molding.

Recent Posts
-

How to Stick Wood Panels to Walls Without Nails
read more >> -

Installing a Waterproof Shower Surround
read more >> -

How to Install FRP and Wall Protection Panels
read more >> -

How to Layer Wainscoting With Wallpaper
read more >> -

How to Use Wallpaper to Create a Faux Brick Effect
read more >> -

Wallpapering Inside Closets & Pantries: A Fun Surprise Element
read more >>


